
Azure Powershell
PowerShell is a command-based shell and scripting language used for task automation and as a configuration framework tool. PowerShell runs on Windows, Linux, and macOS operating systems. Powershell can also be used to script, automate, and manage workloads running on cloud platforms such as GCP and Azure because of its well laid out syntax which makes it easy to learn and use.
In this post we will be looking on how to get started with Azure Powershell but first we must understand some of its components.
What is CMDLET: A cmdlet is a single lightweight command that performs an action.
What is a Module: A module is a set of related functionalities and resources that are grouped together.
Exploring PowerShell’s cmdlets
Get-Command
The Get-Command cmdlet gets all commands that are installed on the computer, including cmdlets, aliases, functions, filters, scripts, and applications. Get-Command gets the commands from PowerShell modules and commands that were imported from other sessions.
Get-Command "name of the command"
Get-Help
The cmdlet displays information about PowerShell concepts and commands.
Get-help "name of the command"
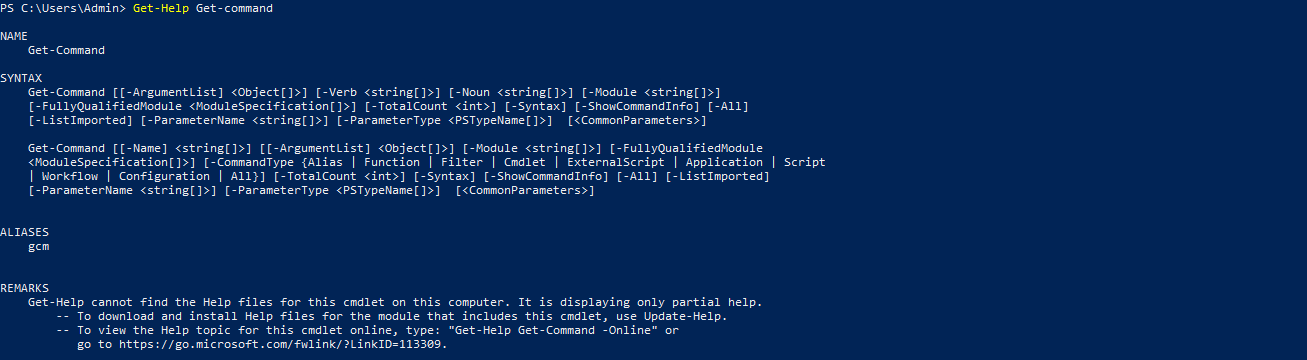
The above command returns basic information however you can add the “full” flag to return every information about the cmdlet or the “example” flag to list only the examples of the cmdlet.
    Get-Help "name of the command" -Full
    Get-Help "name of the command" -Examples
Listing parameters of a cmdlet.
    (Get-help "name of the command").parameters
    (get-command get-childitem).parameters
Shows navigable menu of all options when hitting Tab
In powershell window you can use the tab key to get command completion. So if you enter “get-com” and then type a TAB, it changes what you typed into “Get-Command”.
To list all available parameters for a cmdlet you use Ctrl + Space.

Alternatively you can configure the tab key to perform the above action of Ctrl + Space. Type the following command to open powershell automatic variable with a notepad.
notepad $PROFILE
Paste the following command
# Shows navigable menu of all options when hitting Tab

Set-PSReadlineKeyHandler -Key Tab -Function MenuComplete
Next restart the session. Now if you press the tab key it will be equivalent to pressing the Ctrl + Space keys combination.
Getting started with Azure PowerShell
Installing the powershell module.
Now that we know some basic commands and useful shortcut keys, let’s get our hands dirty. First we shall start by installing one of Microsoft’s powershell modules for managing Azure Active Directory. The modules are MsOnline, AzureAD and Az PowerShell.
- MsOnline – This is the Original and first PowerShell module release that allowed Azure AD management using PowerShell.
- AzureAD – The second released and recommended module, run only on Windows.
- Az PowerShell – Run on all platforms (PowerShell 7) however it is missing many options and doesn’t allow full management of Azure AD.
So today we shall be working with Az Powershell module. Run the command below to install the module.
> Install-Module -Name Az -Force
Once the Azure module is installed, connect to your Azure account using the Connect-AzAccount cmdlet. When you see the Microsoft Azure pop-up, sign in to your Azure account. You’re now logged in to Azure.
Connect-AzAccount
You can also connect to Azure account with a specified tenant and subscription
Connect-AzAccount -Tenant 'xxxx-xxxx-xxxx-xxxx' -SubscriptionId 'yyyy-yyyy-yyyy-yyyy'
To get the current account details used to authenticate Azure Resource Manager requests we use the Get-AzContext cmdlet.

How to create an Azure VM using Azure PowerShell
To create a VM, start by creating the Azure resource group using New-AzResourceGroup. You’ll want to make this a variable because you’ll need it to pass information forward when you create the Azure VM.
> $RG = New-AzResourceGroup -Name "name_of_the_resource_group" -Location "Location"
---
> $Rg = New-AzResourceGroup -Name "Production" -Location "southafricanorth"
 While selecting a location in the Azure portal you just have to select from the drop down menu. However, in PowerShell you have to know exactly what the name of the data center is and whether it supports the resource you are going to deploy.
To list all the available regions run the following command.
While selecting a location in the Azure portal you just have to select from the drop down menu. However, in PowerShell you have to know exactly what the name of the data center is and whether it supports the resource you are going to deploy.
To list all the available regions run the following command.
Get-AzLocation | Format-Table
The Providers property in the output lists the resources available in the region. To find regions that support a specific resource e.g Azure SQL run the following command.
Get-AzLocation | ? {$_.Providers -like "*sql*"} | Format-Table
To list all the services in a particular region:
Get-AzLocation | ? {$_.Location -eq "eastasia"} | select Providers
Next, you’ll create a virtual network followed by a virtual network subnet.
$Vnet = New-AzVirtualNetwork -Name "prodVnet" -ResourceGroupName $Rg.ResourceGroupName -Location $Rg.Location -AddressPrefix "10.0.0.0/16"
$Subnet = Add-AzVirtualNetworkSubnetConfig -Name "ProdSubnet" -VirtualNetwork $Vnet -AddressPrefix "10.0.0.0/24"
Next update the Virtual Network to pick the changes.
$Vnet | Set-AzVirtualNetwork
Creating a Public IP Address
$Pip = New-AzPublicIpAddress -Name "ProdIP" -ResourceGroupName $Rg.ResourceGroupName -AllocationMethod Dynamic -Location $Rg.Location
Next, we will create another variable for the creation the Azure VM using New-AzVM cmdlet. We’ll go ahead and pass the variables that we have created.
$Vm = New-AzVm -Name "ProdVm" -ResourceGroupName $Rg.ResourceGroupName -Location $Rg.Location -VirtualNetworkName $Vnet.Name -SubnetName $Subnet.Subnets.Name -OpenPorts 80, 3389 -PublicIpAddressName $Pip.Name -AsJob
The AsJob switch runs the command in the background this gives you space and time to run other commands in powershell. Such as creation of other resources in Azure. You can inspect the job and progress at any time using the Get-Job cmdlet.
Get-Job $vm
Once the VM is ready, we can view the results in the Azure Portal or by inspecting the $vm variable. Property values listed inside of braces are nested objects.To view specific values in these nested you can run the following command.
$vm.OSProfile | Select ComputerName,AdminUserName
The OSProfile interface Specifies the operating system settings for the virtual machine.
To get the details of any other Virtual Machine run the following command:
Get-AzVm -Name $Vm.Name -ResourceGroupName $Rg.ResourceGroupName -Status
To get details of the Vm’s Network interface run:
$Vm | Get-AzNetworkInterface
$Vm | Get-AzNetworkInterface | Select -ExcludeProperty IpConfigurations | Select PrivateIpAddress
$Pip| Select Name, IpAddress
The following command are used to manage the VM’s
Start the VM:
Start-AzVM -ResourceGroupName $RG.Name -Name $vm.Name
Stop the VM:
Stop-AzVM -ResourceGroupName $RG.Name -Name $vm.Name
Restart the VM:
Restart-AzVM -ResourceGroupName $RG.Name -Name $vm.Name
Remove the VM:
Remove-AzVM -ResourceGroupName $RG.Name -Name $vm.Name -Force -AsJob
To remove all resources in a resource group run the following command.
Remove-AzResourceGroup -Name "ResourceGroupName" -Force -AsJob
Get a list of resources that use Basic SKU in Azure?
Microsoft has outlined that On 30 September 2025, Basic SKU public IP addresses will be retired in Azure.You can use this command to list all Public IP addresses in one subscription that are using the Basic SKU then upgrade them to standard SKU.
Get-AzPublicIpAddress |? { $_.Sku.Name -eq 'Basic' }
You can also query the Resource Graph in order to get the corresponding Public IP addresses across all subscriptions in your tenant.
Search-AzGraph -Query "resources | where type =~ 'Microsoft.Network/publicIPAddresses' | where sku.name =~ 'Basic'"
Note that you can only upgrade to Standard SKU if the IP address is disassociated and has static allocation method.
Disconnect a connected Azure account and removes all credentials and contexts associated with that account.
Remove-AzAccount
The above command logs out of the Azure account associated with the current context. To log out a particular user, use the following command.
Disconnect-AzAccount -Username 'user1@contoso.org'
References:


Leave a comment