Azure Attack Paths Management
Every object in azure (users, service principals, device, apps) combines to form attack paths that adversaries can find and exploit and take over your whole cloud tenant. It’s very difficult for you as a security engineer to manually see these attack paths because of the complex and confusing nature of Azure. As John Lambert from MSFT once said Defenders think in lists while Attackers think in Graphs, perhaps the reason why some attackers manage to be one step ahead of the defenders. Defenders rely on lists of configuration and security benchmarks to impose security on cloud infrastructure.
Most of the existing security solutions products produce countless lists of alerts, vulnerabilities, and risky configurations among others that they have obtained from running security checkups on infrastructure resources such as containers, VMs, and applications. This becomes tedious work and also a problem for security defenders as not only do they need to prioritize these countless alerts but also some of them require collaboration with other organization teams such as developers.
Adversaries on the other hand think in graphs which is a multidimensional approach. Their main goal is to get hold of the organization’s most valuable assets using any available attack paths they can find. Abusing these attack paths which mostly are a result of misconfigurations is more dangerous than other attacks since it’s not about exploiting anything that can be patched.
A Gartner survey once found that misconfigurations cause 80% of all data security breaches.
To effectively prevent misconfigurations and protect the tenant, organizations must understand its whole structure and components, hence real-time mapping of the entire tenant is necessary.
Thanks to SpectreOps tools Bloodhound and Azurehound which have reshaped how Pentesters and Red Teamers execute engagements. Using graphs you are able to see mappings starting from the most critical assets in your tenant and you can easily identify the risky paths.
BloodHound uses graph theory to reveal the hidden and often unintended relationships within an Active Directory or Azure environment. It continuously and comprehensively maps all Attack Paths in the environment. It allows you to shut down attack paths before they are found and exploited by adversaries.
AzureHound is a BloodHound data collector for Microsoft Azure via the MS Graph and Azure REST APIs.
In this blog post, I’m going to demonstrate how to use the above-mentioned tools to map all the possible attack paths in my azure tenant.
Installing Bloodhound:
The following instructions are for the Kali Linux distribution as for the other Linux distribution the installation instructions can be found here.
Install Bloodhound from the apt repository with:
sudo apt update && sudo apt install -y bloodhound
After the installation completes, start neo4j with the following command:
sudo neo4j console
Changing the default credentials for neo4j. Navigate to localhost:7474 and log in with the default credentials:
username: neo4j
password: neo4j
After logging in, you will be asked to change the default password with a new one.
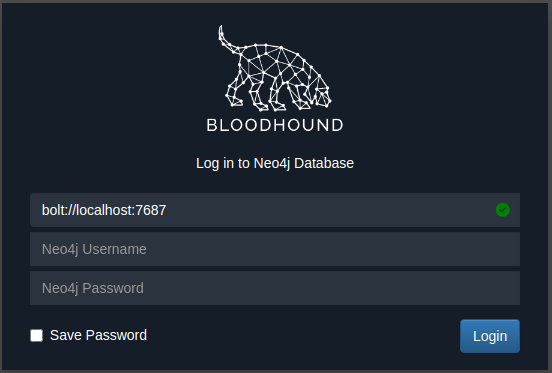
Launch Bloodhound with the new credentials.
> bloodhound --no-sandbox
Installing AzureHound:
Clone this repository Azurehound then, cd into the directory you just cloned and locate the binary called azurehound:
Collecting Data with AzureHound
You need to first authenticate to your azure environment before you start collecting data using azurehoud. We will be using a refresh token which is one of the many authentication flows supported by this tool. However, you can as well as use a username/password combo, a JWT, a service principal secret, or a service principal certificate.
We are using refresh tokens because the authentication process may fail to work especially if the user account being used has MFA and CAP restrictions.
Generating a Refresh Token.
We will use a PowerShell script to perform Azure AD device code flow and generate a refresh token. Open a PowerShell window on any system and paste the following:
$body = @{
    "client_id" =     "1950a258-227b-4e31-a9cf-717495945fc2" # az powershell client ID
    "resource" =      "https://graph.microsoft.com" # Microsoft Graph API
}
$UserAgent = "Mozilla/5.0 (Macintosh; Intel Mac OS X 10_15_7) AppleWebKit/537.36 (KHTML, like Gecko) Chrome/103.0.0.0 Safari/537.36"
$Headers=@{}
$Headers["User-Agent"] = $UserAgent
$authResponse = Invoke-RestMethod `
    -UseBasicParsing `
    -Method Post `
    -Uri "https://login.microsoftonline.com/common/oauth2/devicecode?api-version=1.0" `
    -Headers $Headers `
    -Body $body
$authResponse
The client id is the id of the Azure Powershell application that has delegated permissions to perform what the script is meant to do.
The resource defines where the access token will be valid. In this case, the token will be used to access Microsoft Graph API.
Running the above script will start a new sign-in process and the output will contain a user_code and device_code. Now, open a browser where your AzureAD user is either already logged on or can log on to Azure. In this browser, navigate to https://microsoft.com/devicelogin
Enter the code you generated from the above PowerShell script. Follow the steps in the browser to authenticate as the AzureAD user and approve the device code flow request.
Now go back to your original PowerShell window and paste this:
$body=@{
    "client_id" =  "1950a258-227b-4e31-a9cf-717495945fc2"
    "grant_type" = "urn:ietf:params:oauth:grant-type:device_code"
    "code" =       $authResponse.device_code
}
$Tokens = Invoke-RestMethod `
    -UseBasicParsing `
    -Method Post `
    -Uri "https://login.microsoftonline.com/Common/oauth2/token?api-version=1.0" `
    -Headers $Headers `
    -Body $body
$Tokens
The above code is for obtaining access tokens. The output will include several tokens including a refresh_token. It will start with characters similar to “0.AXMAMe…”. Now you are ready to run AzureHound. Take the refresh token and supply it to AzureHound using the -r switch:
./azurehound -r "0.AXMAMe..." list --tenant "753a0bc5-..." -o output.json
Apart from the flag ‘’list” there are other several optional flags that let you control the scan scope.
See the full documentation here.
You can supply either the tenant ID or the primary domain name on the “tenant” flag.
The “o” flag is for the output file which is a JSON-type file containing the tenant information extracted by running the command.
The screenshot below shows where you can obtain the above information in the Azure portal.

The command will attempt to list all possible data from the target tenant, but you can also use that same refresh token to target any other tenant your user has access to.

Uploading the JSON file to Bloodhound GUI
After you log in to the bloodhound GUI select the upload option from the right-hand side of the interface. Navigate to the location where you have saved the output JSON file select and upload it.

Once the upload is complete, click on the drop-down located on the upper top left side of the screen. There will be a summary display of information extracted from the target tenant including a breakdown of all the azure objects that are present in the tenant.
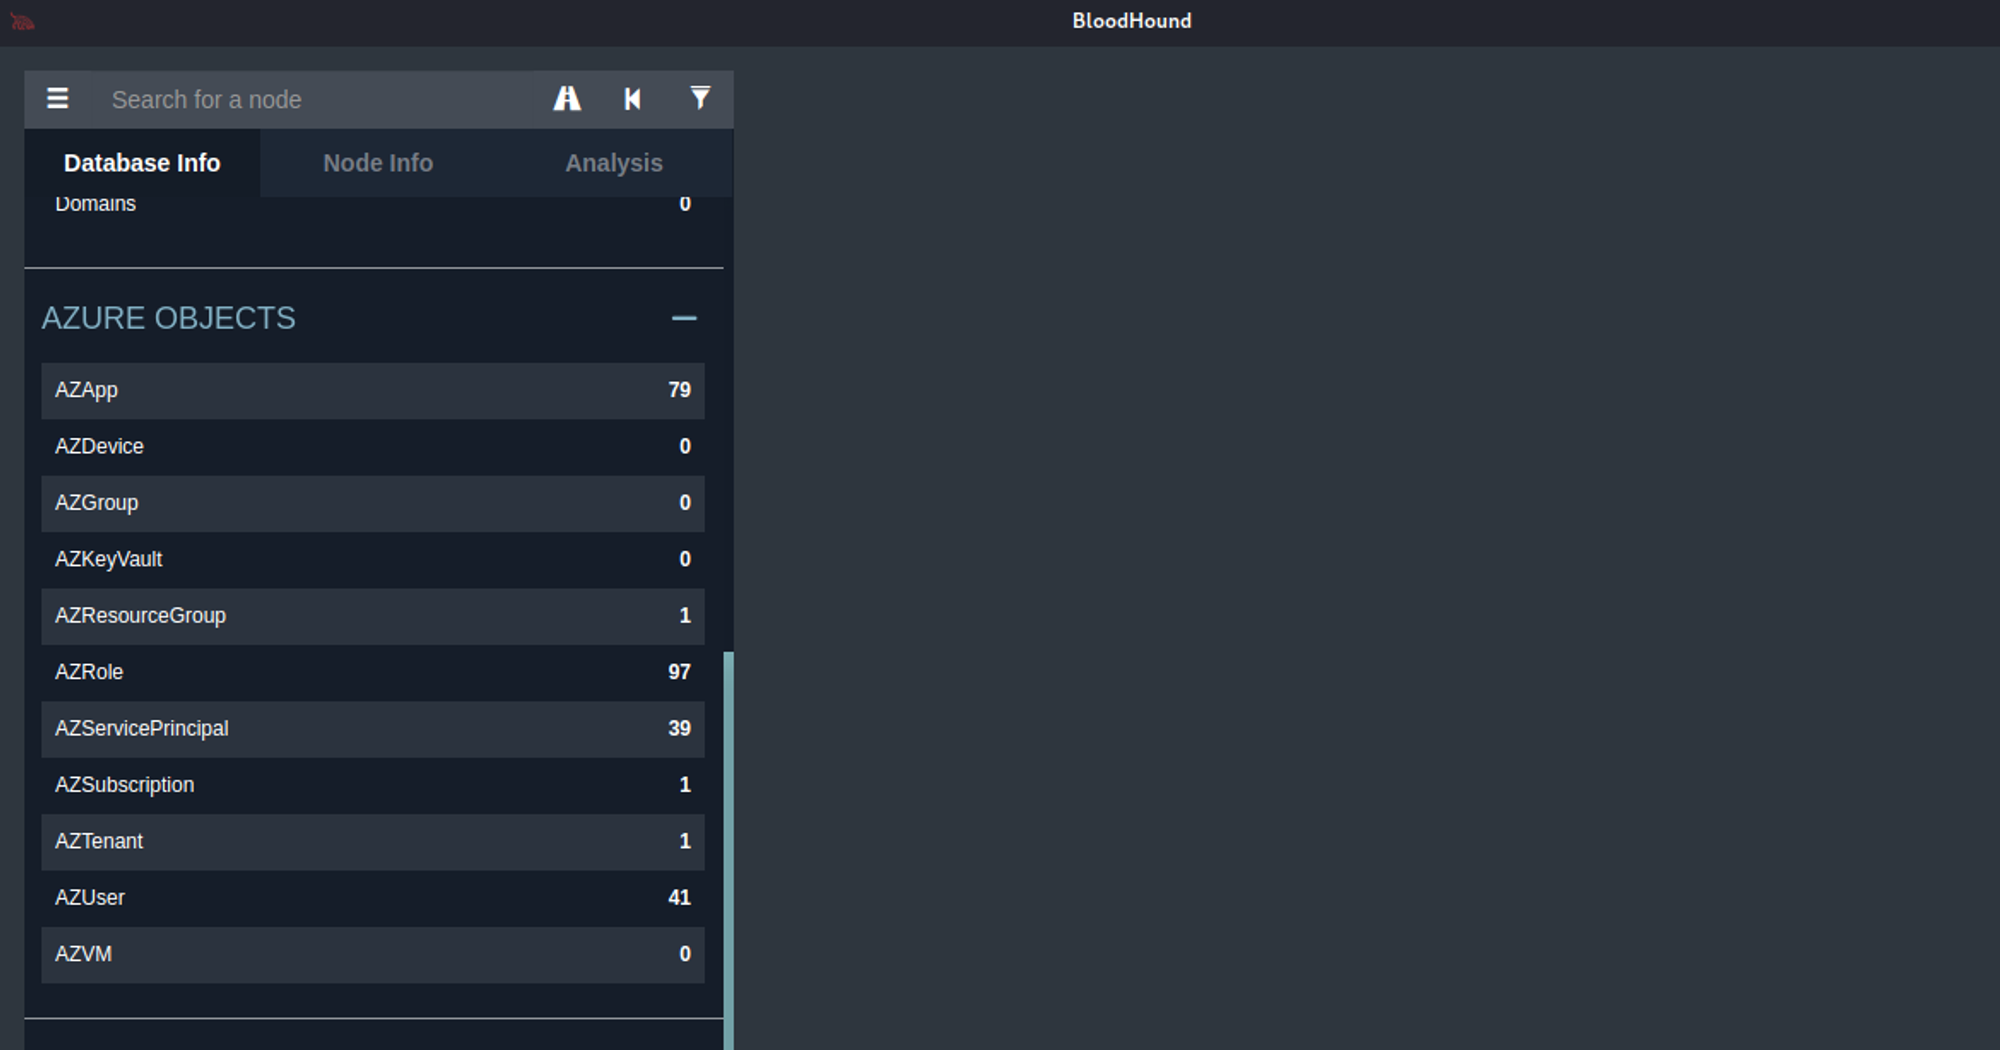
So let’s start performing a security audit of the subject tenant and will start with the Global Administrator role. A user with this role has access to all administrative features and can control the entire tenant.
From the search area, type and select “global administrator”. Click on the node that will appear on the screen.

The left-hand side panel shows information about the selected global admin role. Down in the assignment section, we can see that there are currently 3 active assignments. This basically means that we have 3 objects that have been assigned this role.
Click on the property to see what these objects are.
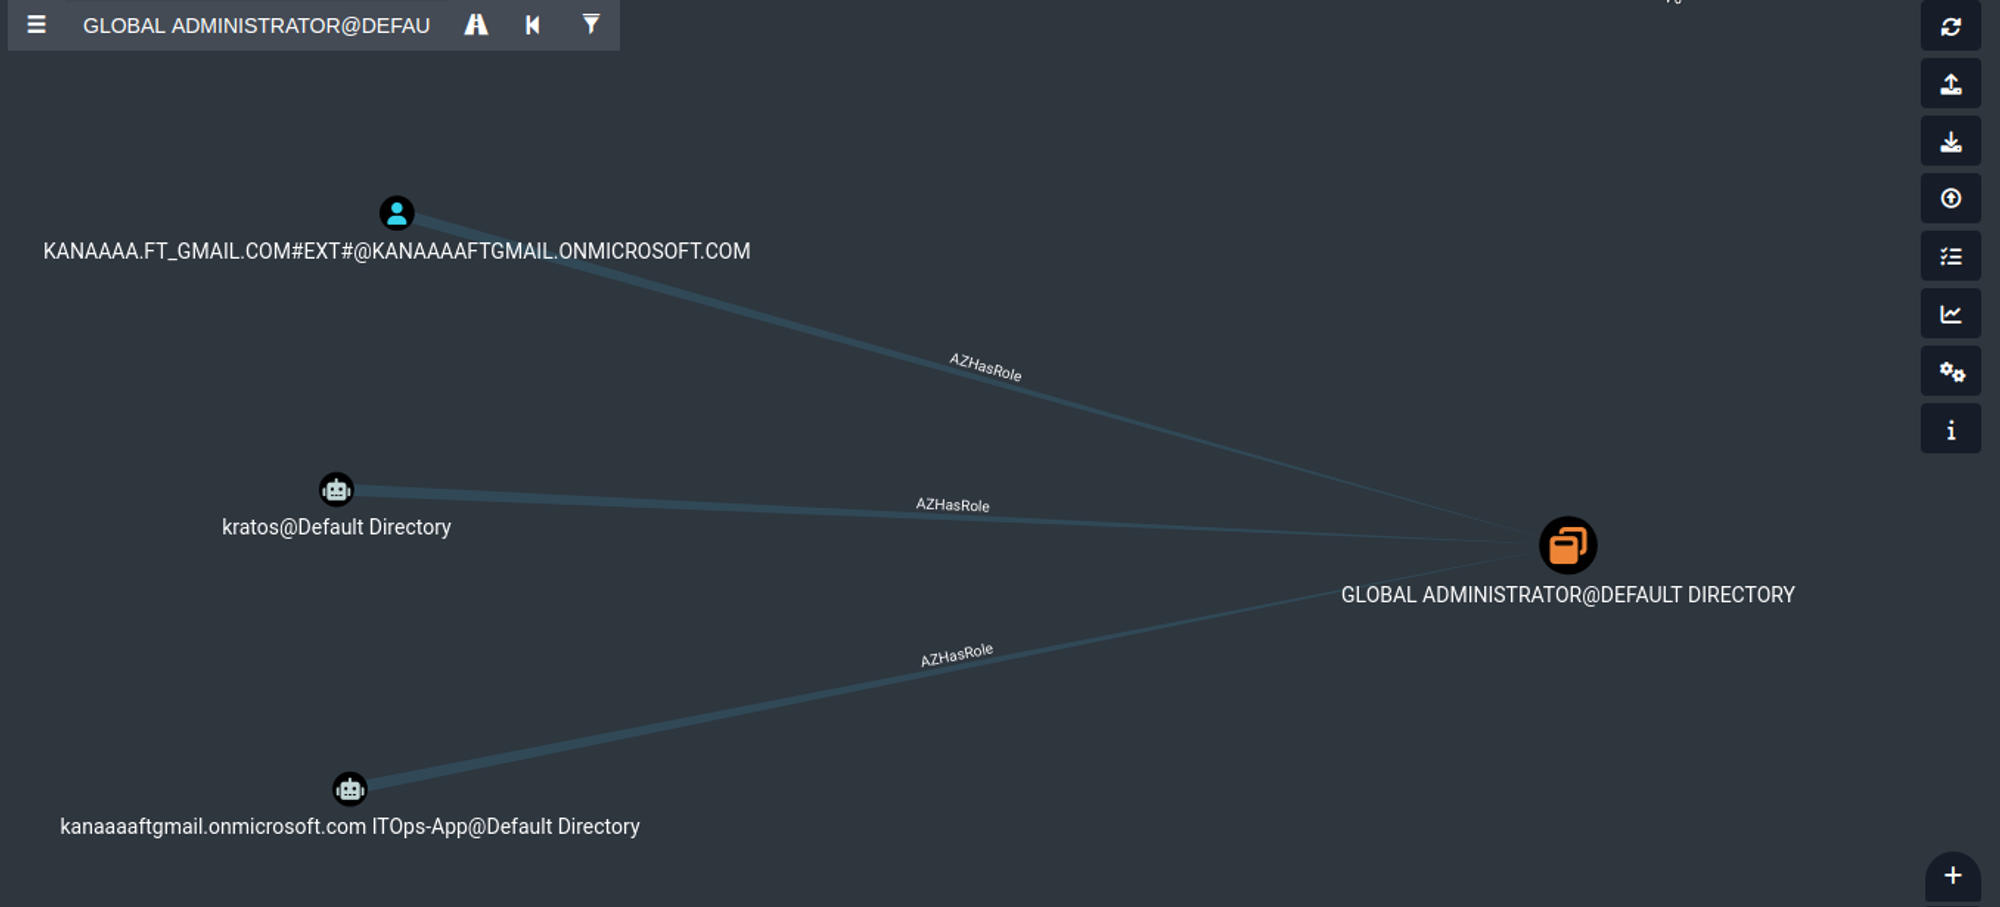
The 3 objects with global admin role are:
- kanaaft_gmail_com#EXT#…
- kratos@Default Directory
- …ITOps-App@Default Directory
The first one is a user account object, this is the owner of the tenant. The person who signed up for the azure subscription and who by default is given the global admin role.
NOTE: The username/ UserPrincipalName appears to have the #EXT# in it because the user has been sourced from other identity providers. In this case, the user was added using their Microsoft Account (MSA).
The other two are application objects, one is called Kratos and the other is called ITOps-APP.
A security engineer of the subject tenant might end up completing the auditing process at this point. Since they already know all of these 3 objects and perhaps they are certain that these are the only objects that should be having the global admin role.
However, when auditing we shouldn’t only look at who has access to global admin roles without looking at who can get control of these objects.
Bloodhound comes to the rescue, with ways of auditing these objects.
Analysis of Tenant Objects
The information that is displayed on the left-hand side panel upon clicking on any of the three object nodes, contains sections called Inbound Object Control and Outbound Object Control.
The Inbound section shows who can gain control over this particular object, while the Outbound section shows the objects that this particular object can gain control over. I hope that makes sense.
Let’s concentrate on the Inbound section, which is further divided into 3:
- Explicit Object Controllers → Objects that directly have control over this object.
- Unrolled Object Controllers → The actual number of principals that have control of this object through security group delegation.
- Transitive Object Controllers → The number of objects that can achieve control of this object through the exploitation of other objects’ privileges.
Deeper analysis of Tenant Objects
When we click on the first object (the owner of the tenant), we see that there are no inbound objects associated with it, however, that is not the case with the other two application objects.
They appear to have transitive object controllers even though they don’t have any explicit or unrolled object controllers associated with them.
Let us pick the ITOps-App and find out the transitive object controllers associated with it.
Upon clicking on the transitive object controllers property, we get another beautiful graphical view of all objects in the tenant that can possibly have control over the ITOps-App object.
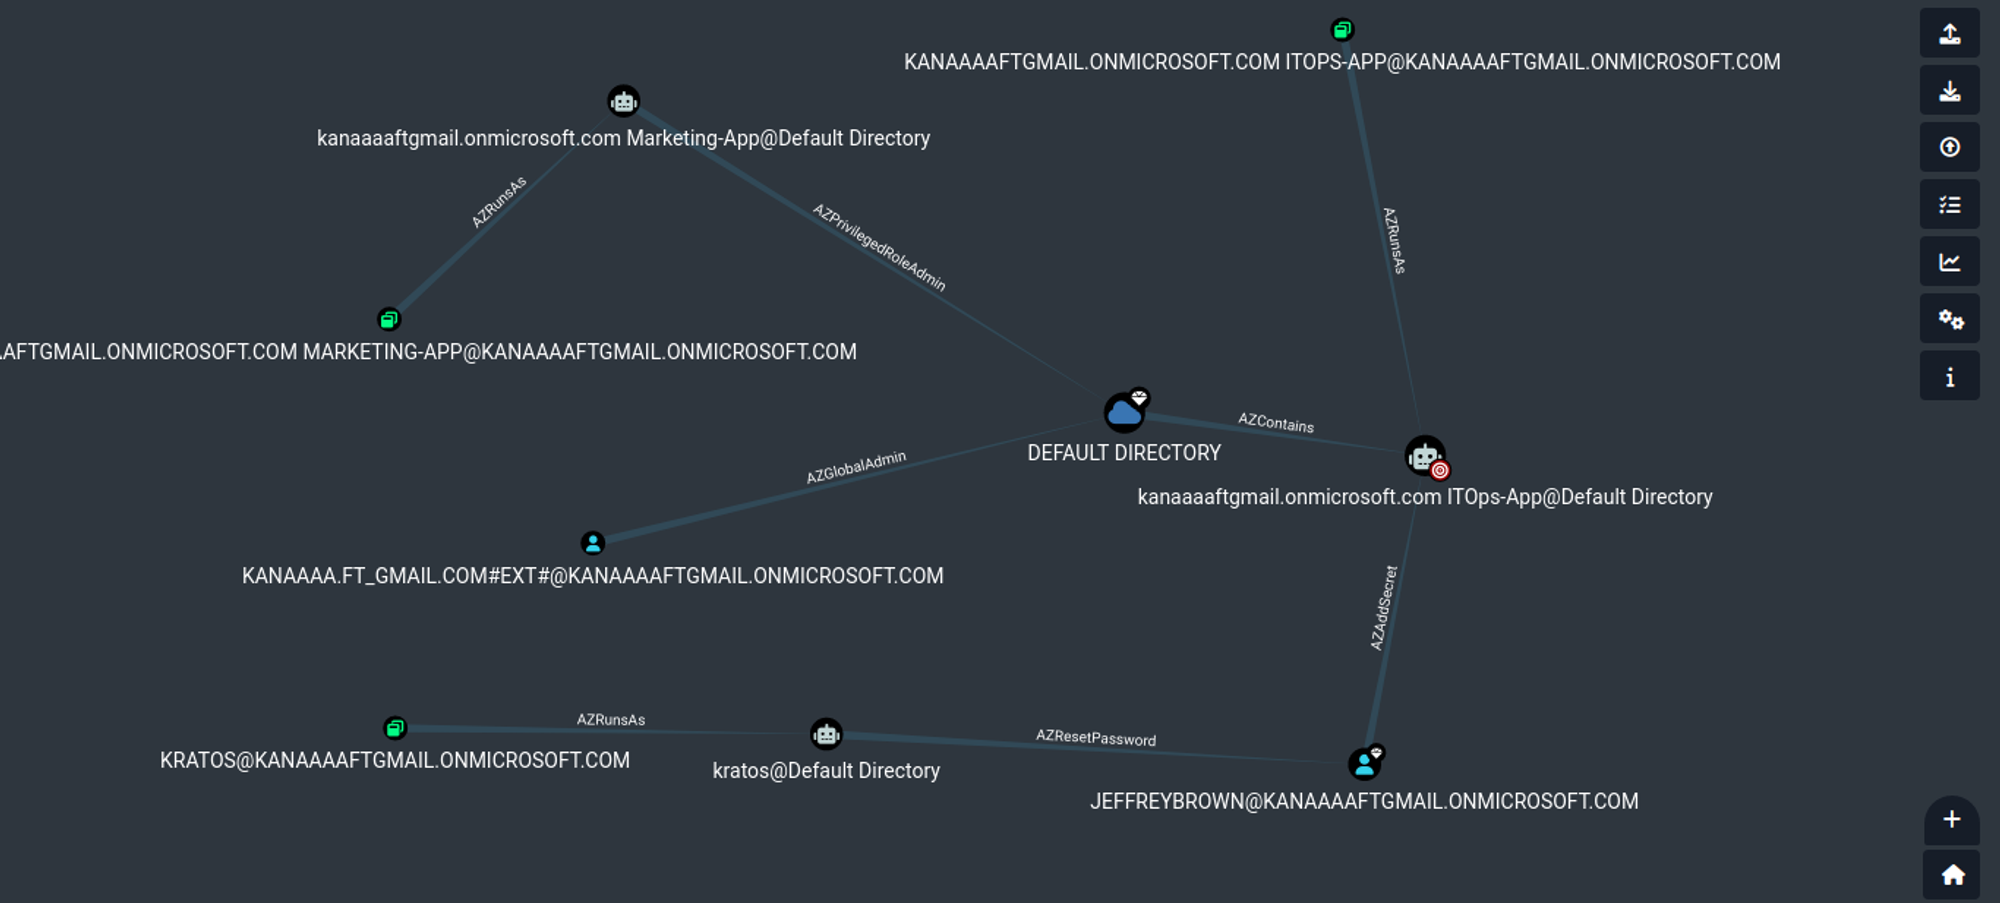
The two objects that can have control of the ITOps-App are:
The first object is what we call an application service principal. Whenever we create an application in Azure AD a service principal is created in the background. It is this service principal that manages the application. Suppose the ITOps-App wants to authenticate to the tenant to perform some action it will do so using this service principal.
The second object is a user account by the name Jeffrey Brown. From the graph, we can see that this user has permission to add Azure secret to the ITOps-App.
What is Azure Secret: This is basically the password that is used by the Azure AD application service principal to authenticate to Azure and gain access to resources that the application has access to. The application can also use a certificate as an alternative mechanism for authentication.
According to Microsoft documentation there is no limit to the number of secret keys that a particular service principal can have if the application has been registered for a single or multi-tenant environment in the Azure AD. However, if the application has been registered for Accounts in any organizational directory (Any Azure AD directory - Multitenant) and personal Microsoft accounts (e.g. Skype, Xbox) and that liveSDK is enabled then the application can have a maximum of two client secrets keys.
This means that the user account Jeffrey Brown can add another secret key to the ITOps-App service principal account and use it to authenticate to the tenant. Since the ITOps-App service principle account has the global admin role this will mean that Jeffery Brown can do anything he wants in the tenant including granting their own account the role of global admin.
How is all this possible?
Well, from the screen if we click on the Jeffrey Brown object node and look at the information displayed on the left-hand side panel. Under the overview property, it shows that this user account has 1 Azure Admin role. Click on it and the graph will display which particular Azure role this is.
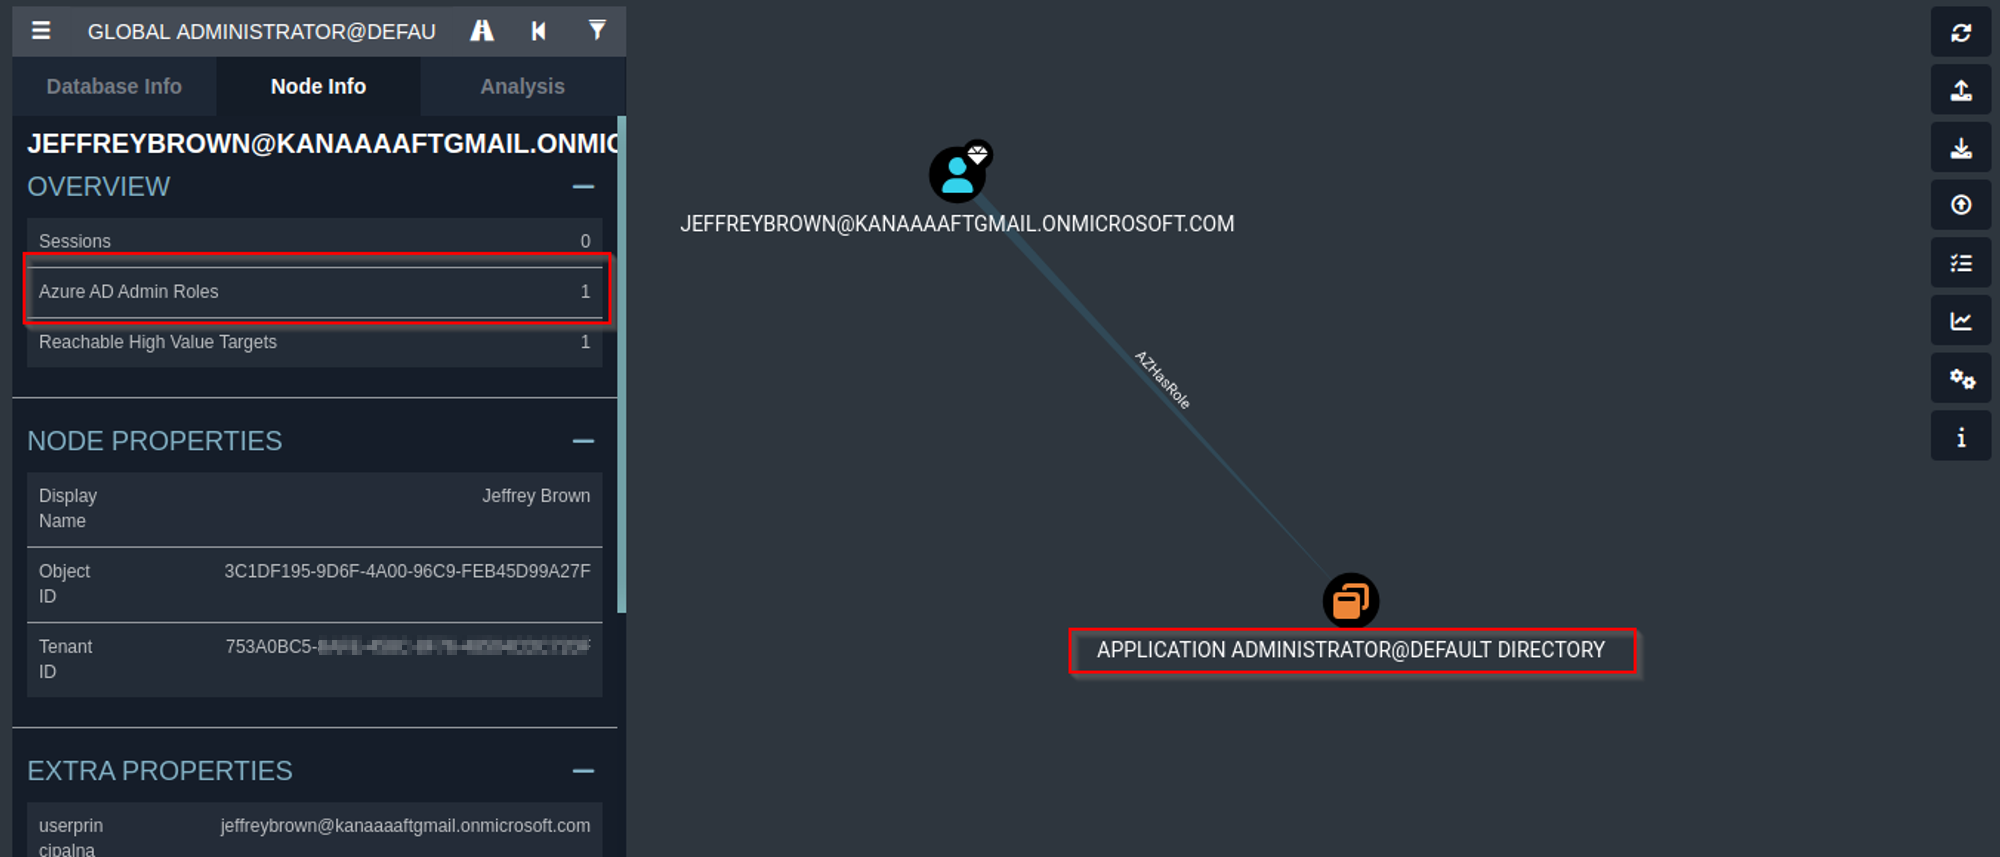
Jeffrey Brown’s user account has been assigned the Application Administrators role. Application Administrators can reset credentials or client secrets for any application Service Principal in an Azure AD tenant this means it holds special privileges that open up specific privilege escalation attack primitives using Service Principals.
Generating Azure Client Secret:
To demonstrate how Jeffrey Brown’s user account can perform privilege escalation we will first have to authenticate to Azure tenant using his credentials and then generate a new client secret for the ITOps-App Service Principal.
Will use Azure CLI Powershell module:
az login --allow-no-subscriptions
After a successful login, we will use the az ad app credential reset command to add a new client secret to the ITOps-Apps application service principal.
az ad sp credential reset --id "DBC9BCC9-CB5B-455C-B2AF-61803398E972" --append
We supply the “id” flag with the object id of the service principal which you can obtain from the bloodhound graph by clicking the ITOps-App application’s service principal node.
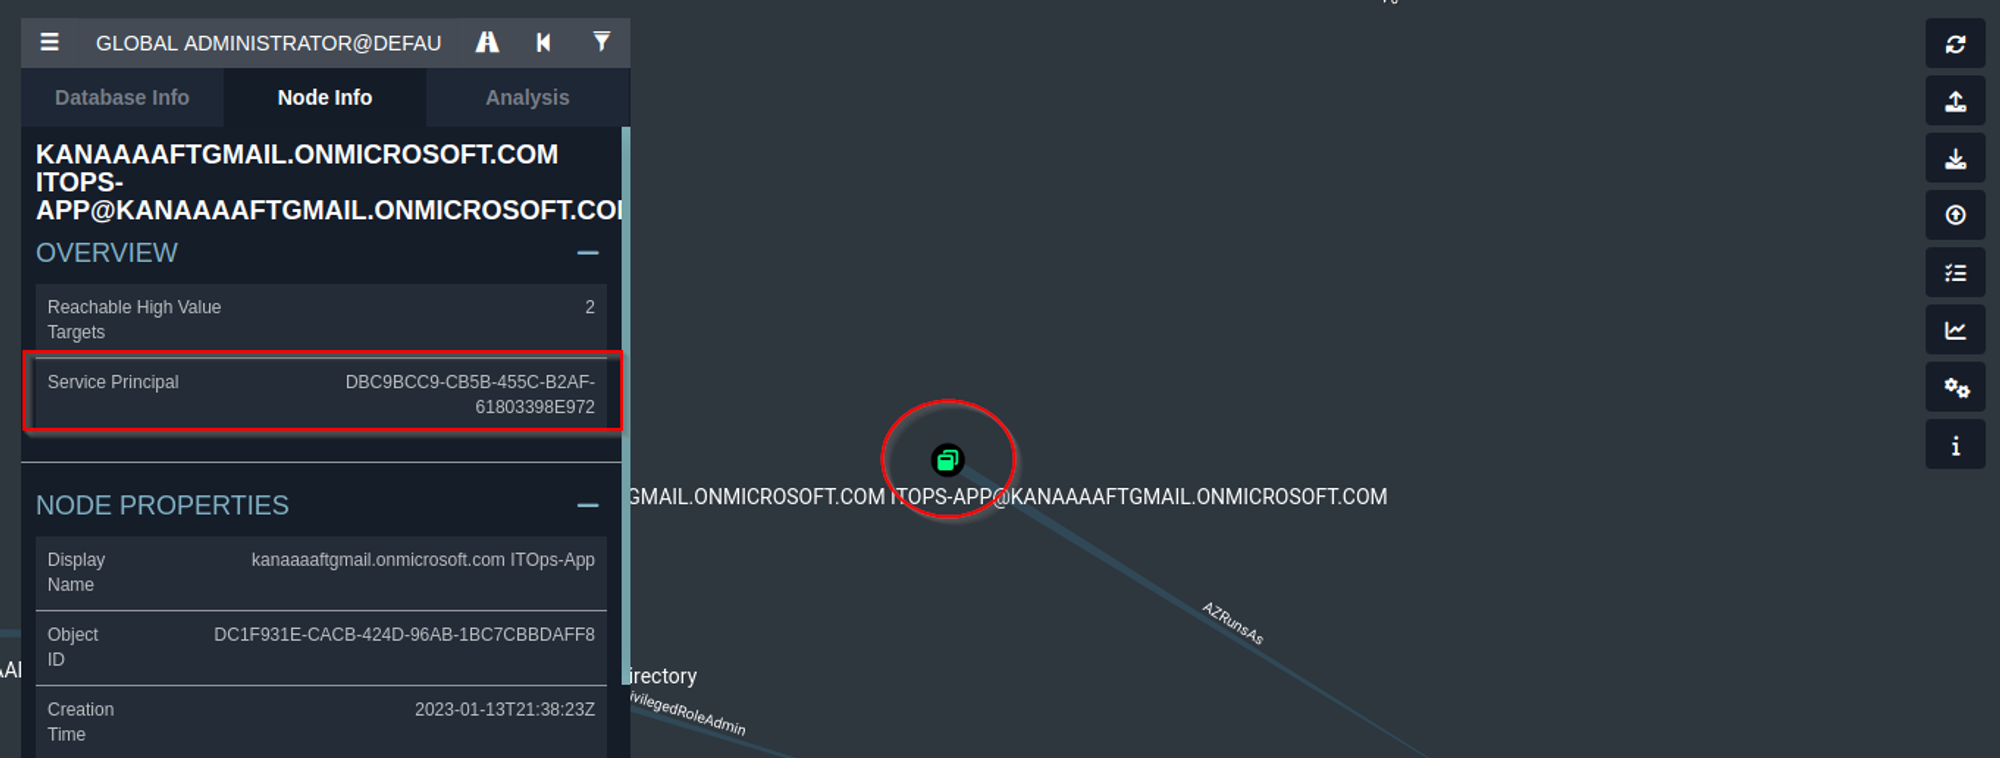
By default, the command clears all passwords and keys, and lets the graph service generate a password credential but the “append” flag adds the new credential instead of overwriting.

Authenticating to Azure as ITOps-App application’s service principal
Using the newly generated credentials we will authenticate to the Azure tenant as the ITOps-App application’s service principal.
az login --service-principal -u $username -p $password --tenant $tenant --allow-no-subscriptions

Adding user to Global Admin group Role via MS Graph API
Microsoft Graph provides a REST API that allows you to access and manage many Azure Active Directory objects, this can be done by sending a POST, PUT, or GET request to a set of endpoints at https://graph.microsoft.com.
The principal calling the MS Graph API must be authenticated and authorized to perform the requested actions on the objects specified in the request.
Let’s use the Azure CLI command az rest. This command enables custom requests to MS Graph API be made.
If no authentication argument is passed to the az rest command then it will automatically use the Azure account you already logged in with which in our case is the ITOps-App application’s service principal.
$Body="{'principalId':'3C1DF195-9D6F-4A00-96C9-FEB45D99A27F', 'roleDefinitionId': '62e90394-69f5-4237-9190-012177145e10', 'directoryScopeId': '/'}”
az rest --method POST --uri https://graph.microsoft.com/v1.0/roleManagement/directory/roleAssignments --headers "Content-Type=application/json" --body $Body
The “uri” flag represents the target resource which is Ms Graph role management endpoint.
The “principalId” is the identifier of the principal to which the assignment is granted. In our case, it is Jeffrey Brown’s user account object ID.
The “roleDefinitionId” is the identifier of the role definition the assignment is for, that is the global administrator.
The “directoryScopeId” is the identifier of the directory object that represents the scope of the assignment.

Upon executing the command we can verify that Jeffrey Brown’s user account has been added to the global admin role by visiting his account in the Azure portal and verifying the roles assigned to him.

Adding Global Admin to Azure Subscriptions
Even though Jeffrey Brown is now a global admin, he is not able to view azure subscriptions on the subject tenant directory.

Microsoft documentation states that as a Global Administrator in Azure Active Directory (Azure AD), you might not have access to all subscriptions and management groups in your directory.
Azure AD and Azure resources are secured independently from one another. That is, Azure AD role assignments do not grant access to Azure resources, and Azure role assignments (RBAC) do not grant access to Azure AD. However, if you are a Global Administrator in Azure AD, you can assign yourself access to all Azure subscriptions and management groups in your directory and access any resource such as virtual machines or storage account.
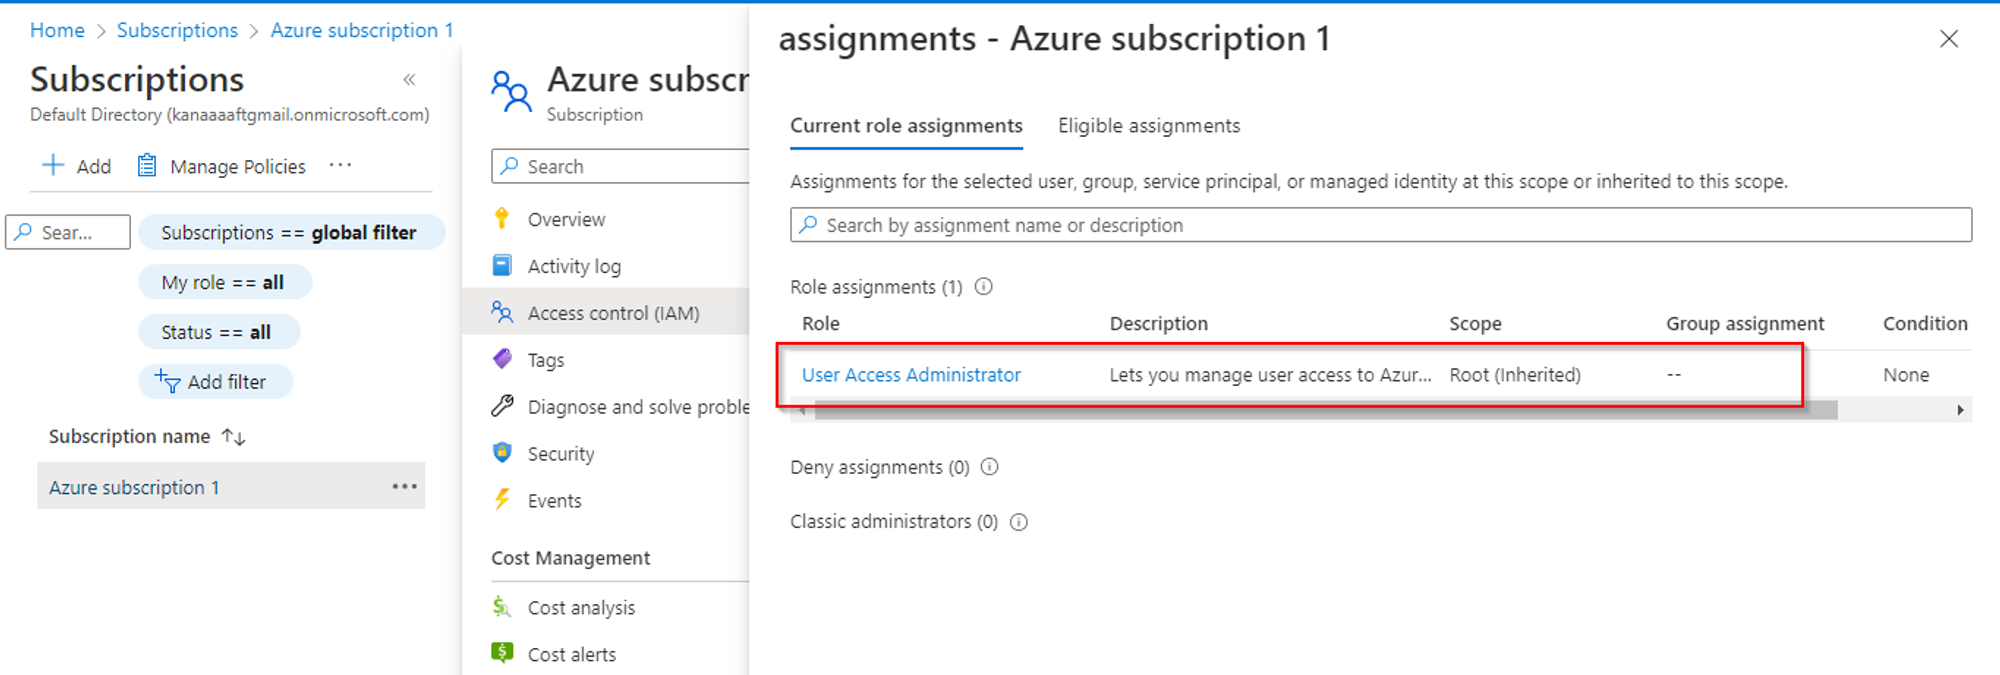
When you elevate your access, you will be assigned the User Access Administrator role in Azure at root scope (/). This allows you to view all resources and assign access to any subscription or management group in the directory.
While signed in to the Azure portal as a global admin. Open Active Directory and select the properties section on the left-hand-side panel. Scroll all the way to the bottom of the blade then under Access management for Azure resources, set the toggle to Yes and click on save.

When you set the toggle to Yes, you are assigned the User Access Administrator role in Azure RBAC at root scope (/). This grants you permission to assign roles in all Azure subscriptions and management groups associated with this Azure AD directory.
After you sign out and sign back in to refresh your access. You should now have access to all subscriptions and management groups in your directory. When you view the Access control (IAM) pane, you’ll notice that you have been assigned the User Access Administrator role at root scope.
In this article, I introduced SpectreOps tools Bloodhound and Azurehound. I showed how they work together, and I provided step-by-step instructions on how you can use them to identify dangerous attack paths in an Azure tenant, which would be difficult to identify using manual methods. Remember even the tiniest misconfiguration is an opportunity for bad actors to exploit your business environment.
The next part of this blog will be looking at how to identify and prevent privilege escalation attacks arising from these security misconfigurations.



Leave a comment